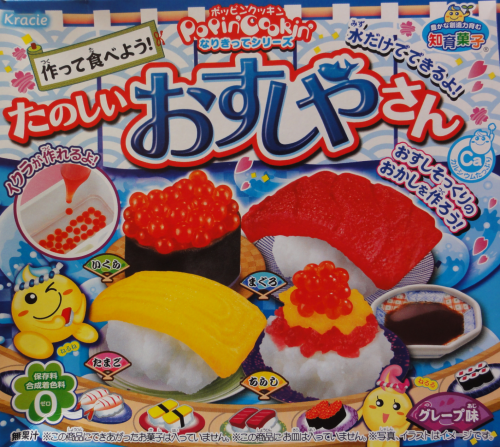
This post is featuring the making of ‘sushi’ sweets with the ‘Fun Sushi Shop’ (楽しいお寿司屋さん・たのしいおすしやさん) DIY kit in the Popin’ Cookin’ Chef Series, produced by the Japanese food and pharmaceutical multi concern Kracie (クラシエ) and available, for instance on amazon.co.jp in lots of 5 or 10.
As we go towards the end of the year 🎅🎄, you might wanna try something new with your youngsters or for yourself, besides the traditional cookie making. There is a variety of 10+ such cute DIY kits 🍬🍭 you may choose from, differing in style and flavor (a list on the bottom of this article). In Japan they are categorized as Education Sweets (知育菓子・ちいくかし) for kids (3 – 12 years) to sensitize them from an early age on for the respectful handling of foods and to nurture their imagination by hands on experience. However, they are not only kids’ stuff, as nowadays they enjoy huge popularity at home and abroad with people of all ages. For a start, I tried myself on the ‘Fun Sushi Shop’ kit 🍣, which totally lived up to its name, making for a joyous pastime at this time of season. Let’s see how I did and get down to cookin’!
I had the kit stowed away for some time in my cupboard, but since they can be stored for more than 6 months, it was not a problem at all to consume them at this stage. Fortunately, today I got finally down to do it and it was good fun to follow the making process and eat them pleasurably afterwards 😊.
I guess there are already a couple of guides of the sort out there how to make the sweets, nonetheless I like to write an article about it to share the joy with others. The product instructions are all Japanese only and I did my best to translate them for the ease of understanding. The pictures help to some degree, but there are details good to know to make your perfect ‘sushi’ assortment. In addition to my translated version, I kept some of the Japanese words because they might occur on other DIY kits that you might end up trying, so it should kind of serve you as a general look up.
The sweets that come in powdered form, don’t contain any preservatives or artificial food coloring/flavors to make them save for children. As for the ‘Fun Sushi Shop’, it tastes of grape 🍇, so you don’t have to wrinkle your nose for eventual raw fish smell. If you don’t like grapes though, it can’t be helped 😜. But even then, it is great fun to hand shape the 4 different sushi types.
General Product Information
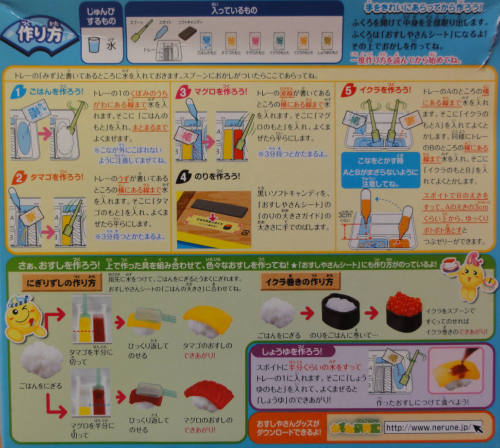
The above is what the back of the package looks like. You see the procedure is made up of 5 main steps. Since it was my first Kracie kit ever, I had read everything meticulously, but once you know how it all works, the sweets just take a couple minutes to complete.
I didn’t take a picture of the product specifications, but will translate the fine print of that subsequently together with the caution notice seen further below:
● Category: Sweets ● Ingredients: sugar (砂糖・さとう), dextrin (デキストリン), vegetable oils and fats (植物油脂・しょくぶつゆし), milk sugar/lactose (乳糖・にゅうとう), starch (でん粉・でんぷん), corn syrup (コーンシラっプ), reduced sugar syrup (還元水あめ・かんげんみずあめ), gelatin (ゼラチン), fermented milk (発酵乳・はっこうにゅう), concentrated yogurt (濃縮ヨーグルト・のうしゅくヨーグルト), milk protein/albumin (乳たん白・にゅうたんぱく), grape sugar/glucose (ぶどう糖・ぶどうとう), manufactured food starch (加工デンプン・かこうデンプン), calcium carbonate (炭酸カルシウム・たんさんカルシウム; CaCO3), aroma (香料・こうりょう), gelling agent (ゲル化剤 (アルギン酸ナトリウム)・ゲルかざい (アルギンさんナトリウム)), sorbitol (ソルビトール), natural coloring agents (着色料・ちゃくしょくりょう: caramel = カラメル, vegetable pigment = 野菜色素・やさいしきそ, squid ink pigment = イカスミ色素・イカすみしきそ, gardenia fruit = クチナシ, red malt/yeast = 紅麹・べにこうじ, red yellow flower = 紅黄花), polysaccharide thickener (増粘多糖類・ぞうねんたとうるい), lactic acid calcium/calcium lactate (乳酸カルシウム・にゅうさんカルシウム), calcium sulfate (硫酸カルシウム・りゅうさんカルシウム), emulsifier (乳化剤・にゅうかざい), glycerin (グリセリン), pyrophosphoric acid sodium (natrium) (ピロリン酸ナトリウム・ピロリンさんナトリウム) (please take notice that those components might be subject to change with product renewals over time; a quick double check on Amazon Japan shows that it also may contain egg white and soybean)
● Content weight: 28.5g ● Expiry Date (best enjoyed by) mentioned in the right lower corner margin ● Manufacturer: Kracie (and address)
Substances that could cause allergic reactions (mandatory information, suggested commodity; 表示義務・推奨品目): milk, cuttlefish/squid, gelatin

「Caution! (advise for parents when supervising kids): ● Please strictly follow the recipe for making and consuming ● Please refrain from heating in the microwave ● Please don’t eat in powdered form ● Please assure that the spoon is not chewed or swallowed ● Please don’t eat the made sweets as one big piece, rather cut them in small pieces and chew them well. ● Please consume the sweets right after you could enjoy the making of it.」
「The making process is difficult for a child, therefore a parent should assist. Using mineral water with a high degree of calcium might not work optimally, therefore please don’t use.」

Nutritional facts for one serving (28.50): ● Calories: 112 kcal ● Protein: 0.1g ● Fat: 0.4g ● Carbohydrate: 27g ● Natrium: 32mg ● Calcium: 198
Making
So much for the essential facts around the product, let’s go ahead with the opening and merrily making sushi :)! Here is, where you can open the box. Tear the package open by pulling from the red arrow on the bottom.

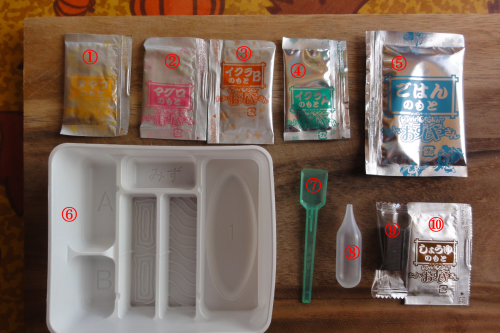
The set comes with the above numbered items: ● 1. The powder for egg (卵・たまご; tamago) ● 2. tuna (マグロ; maguro) powder ● 3. salmon roe (イクラ; ikura) powder package B ● 4. salmon roe powder package A ● 5. powder for rice ● 6. making mold ● 7. spoon ● 8. dropper ● 9. seaweed (のり) soft candy ● 10. soy sauce (しょうゆ) powder

Then let us inspect the tray in more detail. For each powder there is one dedicated container. When mixing the powder with the water try to keep the other containers clean. ● 1. water container to rinse the tools ● 2. rice container, which will be used for mixing the soy sauce at the end ● 3. egg container ● 4. tuna container ● 5. salmon roe A container ● 6. salmon roe B container
Besides the above introduced items, the only other main ingredient you require is drinking water and then you are good to go.
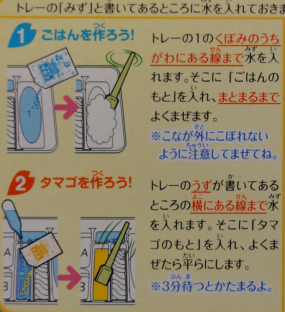 Step 1 – Rice making: give water in the rice container (no. 2 above) up to the edge/line of the shallow hollow. All containers have such a line, so it is straight forward how much water you need to add. Mix the powder and water carefully to not spill anything until compact and all powder absorbed into a ball. See next picture.
Step 2 – ‘Crack’ the eggs: fill water to the line of the egg container with swirled pattern (no. 3). Add in the powder and stir till it’s slushy. Then smooth it flat and wait for 3 minutes until the mass thickens. While it is sitting you may proceed to step 3.

 Step 3 – Tuna turn: the process is the same as for the egg. Fill the container (no. 4) with water to the line on the side and sprinkle the tuna powder carefully while stirring. Also flatten the slushy mass and wait for 3 minutes before removing. How it looks like you can see in the picture below.
Step 4 – Rolling out the nori: it is number 9 on the item list and looks something like a licorice candy or eraser. I will give more details about it just after the next image.


The seaweed turned out a bit too thick at the ends and deformed there in the middle, where the tears can be seen. You can stretch it to the length of the dotted field that is prepared below the instructions. Brings to mind – what I was meant to say, once you open the package the tray with ingredients is wrapped again. On that wrapping you will find the above shown instructions. Actually it serves as the sushi board later on, with which you can serve the ready-made sushi. After all it is a Japanese product, so not the tiniest of detail will be left out 😊.

Step 5 – Roe to the general: You are pretty much half into the process. A little more to go for your DIY sweets sushi. Also here make sure after you give the water into the forms (no.5 = A; no.6 = B) to not mix them. The B pool will turn orange, where you should let the powder diffuse sufficiently. The A container, will have a light blueish color to it. When B is ready, suck it up with the pipet or dropper and then let it drop slowly one after the other from about 3cm above into the A container, where it will turn into little balls that just look like real salmon roe😮. You will get a lot of those to pack your Ikura Maki (イクラ巻き・イクラまき; salmon roe roll) with 😘. Here is what they look like:


When done with the roe, you can go back to rice. Now split the big rice ball into smaller portions of four. Wet your fingertips a bit to neatly shape the smaller portions so you can place the jam like tuna and egg on top. At the time you take the two out of the forms, cut them in half. One half of each you will later on use for the Chirashizushi (散らし寿司・ちらしずし; sushi rice with a variety of ingredients sprinkled on top of it). More about it further down below.
 After the maguro (tuna) and tamago (egg) sushi are finished, we turn to the Ikura Maki. Place the ‘seaweed’ around the rice and form a roundish ship, where you will bed the glistening ikura on top.
Don’t start nibbling just yet! I know it is going to be hard not to, but you almost reached the goal. You also don’t want to enjoy your sushi without soy sauce do you!? Take the dropper and fill it half with water. Then squeeze it out in the oval rice container. Stir until the powder is fully dissolved and takes on the color of darkish soy sauce. If you happen to have an actual soy vessel you can serve it in there or alternatively you can put the soy sauce right on top of the sushi, which was how I did it. I wasn’t up for a long ritual ;).

The making of the chirashizushi represents the last step before you can indulge in the sweets. You can take the dotted field, where it says ‘ごはんの大きさ’ or the ‘size of the rice’, to get the right amount. For the chriashizushi I made however a slightly larger rise bed, so that all the topping fits nicely on it. We don’t want things falling down on the way to the mouth, do we? What you do next, take the other half of each, egg and tuna, to cut them up in tiny little pieces. When done, first lay the hashed tuna on the rice, followed by the egg and as a crown you carefully place the remaining salmon roe – the crown jewels 💎 so to speak.

If it was not for the grape flavor, the texture as seen in this photo and mouth feel, were surprisingly authentic. Especially the ikura had a little crunch to it, which gave the sensation of eating the real thing.

Appetite for more? Want to try it out yourself? Here the most popular Popin’ Cookin’ kits lined up (usually sets of 5 or 10 boxes):
‘Fun Sushi Shop’ and ‘Happy Kitchen Taiyaki & Odanguri (Fish Pancake & Bun)’
‘Fun Ramen Shop’ and ‘Pudding Parfait’
‘Let’s Make Older Brother’s Lunch’ and ‘Happy Kitchen Mixed Pizza’
‘Happy Kitchen Donuts’ and ‘Happy Kitchen Hamburger’
‘Let’s Make Obento’ and ‘Spinning Takoyaki’
Try it out, it’s great fun! I hope my little guide will be of use to you. The full Popin’ Cookin’ Chef Series and other Kracie sweets you find at amazon.co.jp that is where I got my stuff from. Don’t know how it works? Learn more about how to shopping on amazon.co.jp with my dedicated SIDE PAGE. If you have any comments for me about the article and instructions, please leave me one below. Also feel free to share 💬 this in your social network 👥.
Disclaimer: The products above referred to are not sold through MyLittle Dejima and serve merely for the purpose of product introduction. Please carefully check for the ingredients and allergic substance before consuming. If the consumption causes sickness or allergic reactions, it is advised to immediately stop and consult with a medic. However, be aware that any liability that is directed towards MyLittle Dejima will be strictly rejected, as all the responsibility lies with you and you alone. Also should any financial disadvantage arise from any transactions, such claims as well will be refused.
Article Guide:
- Words in purple color link to other articles/pages on MyLittle Dejima
- Words in blue color link to external references/pages
- Words in simple bold, titles and article relevant information without external reference/page
Edition: First release: November 31st, 2016
©MyLittle Dejima
